
Lumber Drying
How wood gives up water, what sets the drying rate, how a kiln is built and controlled, and the defects that come from drying too hard.
Presented to WSE 461/561 at Oregon State University · 2021
- Level
- Intermediate
- Length
- 75 minutes
- Who it’s for
- Builders, dealers, specifiers and mill operators
- Format
- In person or webinar
What you’ll learn
- Explain how heat and moisture move through wood — conduction and convection carrying heat in, capillary flow and diffusion carrying water out.
- Describe how air temperature, relative humidity and velocity set the drying rate, and why thickness scales drying time by its square.
- Distinguish the constant-rate and falling-rate periods, and use the drying-rate curve to reason about drying time and target moisture content.
- Predict how specific gravity, heartwood, species, green moisture content and grain direction change how fast a given board dries.
- Read a psychrometric chart and an EMC table, and explain how a kiln schedule sequences dry-bulb and wet-bulb setpoints.
- Describe the main kiln types and how they are heated, zoned and controlled.
- Recognize the common drying defects — surface and end checks, collapse, honeycomb, casehardening and warp — and name their causes.
Green lumber is roughly half water. A freshly sawn board can carry more weight in water than in wood — moisture contents above 100% are ordinary in green timber, because moisture content is measured against the oven-dry wood, not the wet board. Before that board can be sold, shipped, machined, glued, coated or treated, most of that water has to come out. Drying is the single most important — and most expensive — thing that happens to lumber between the log and the jobsite.
This is the written version of Lumber Drying, the companion to Wood Science 101. Where that course explains why wood moves, this one explains how we get it to a moisture content where it will stop surprising you: how wood gives up water, what sets the drying rate, how a kiln is built and controlled, and the defects that appear when wood is dried harder than it can take.
1. Why we dry lumber — and why it costs so much
Drying is not optional, for reasons that stack up fast:
- Decay and stain. Water is the precondition for every fungus and most of the insects that attack wood. Below about 20% moisture content, the decay organisms covered in Wood Science 101 cannot get started.
- Shrinkage and stability. Wood shrinks and swells only below the fiber saturation point (~30% MC). Drying to the moisture content the wood will live at gets that movement over with before the board is in a wall or a floor, instead of after.
- Shipping weight. You do not want to pay freight on water.
- Machining, gluing, coating and treating. Adhesives, finishes and preservatives are all formulated for wood at a target moisture content. Apply them to wet wood and the bond, the film or the treatment fails.
All of that is worth doing, but none of it is cheap. Drying can be up to 70% of the energy used to manufacture a wood product, and the costs do not stop at the fuel bill:
- Degrade. Dry a board too aggressively and you crack it, warp it or collapse it — turning a high-value board into a low-value one. The defect section below is a catalog of ways to lose money.
- Time. A kiln charge can take days to weeks. Drying is often the bottleneck between an order and a shipment.
- Emissions and controls. Kilns release CO₂, volatile organic compounds, hazardous air pollutants and particulates, and the capital and operating cost of controlling them is real.
Every decision in the rest of this course is a trade between drying fast, drying cheap, and drying without wrecking the wood. You rarely get all three.
2. How wood gives up water
Removing water is a two-part problem: get heat into the wood, and get water out of it.
Heat in
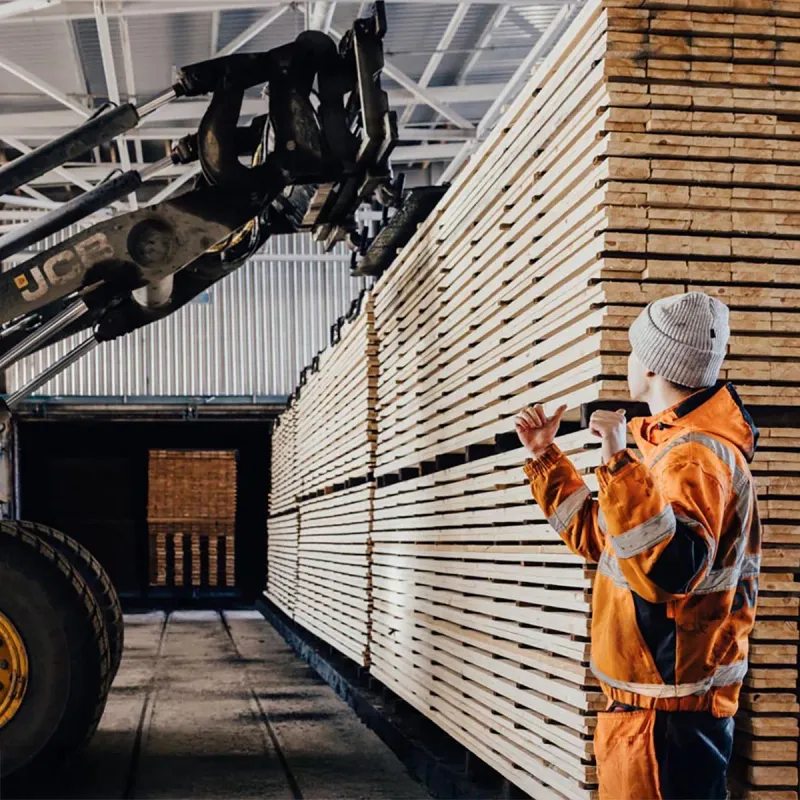
Energy has to reach the water to break the hydrogen bonds holding it and turn it to vapor. There are four ways to move that heat — conduction (direct contact), radiation (a hot source in line of sight), convection (a heated fluid such as air), and high-frequency electromagnetic fields (radio-frequency or microwave). In a commercial lumber kiln, convection with hot air is overwhelmingly the most common: fans drive heated air rapidly past the surface of every board.
Two things then happen in sequence. Heat transfers from the air to the board's surface, and then conducts inward through the wood. The rate of heat transfer to the surface rises with surface area, with the temperature difference between the air and the wood, and with air velocity. The rate of heat transfer to the center depends on how far the heat has to travel — and that is where thickness dominates.
Water out
Inside the board, water moves to the surface two ways:
- Capillary flow — liquid free water moving through the cell cavities. Fast, but it only works while there is free water present (above the fiber saturation point).
- Diffusion — bound water and vapor migrating through the cell walls down a moisture gradient. Much slower, and it is what governs drying once the free water is gone.
Water that reaches the surface evaporates and is swept away by the airflow. So the surface can only dry as fast as the inside can deliver water to it — and delivery is the slow step.
Thickness is the tyrant
Because heat and water both have to travel from the surface to the core and back, drying time scales with the square of thickness:
Drying time ∝ (thickness)²
Double the thickness and you roughly quadruple the drying time. A 2-inch board takes about four times as long as a 1-inch board of the same species — which is exactly why thick stock, and dense slow-moving species, are the hard cases in any kiln.
3. The drying-rate curve
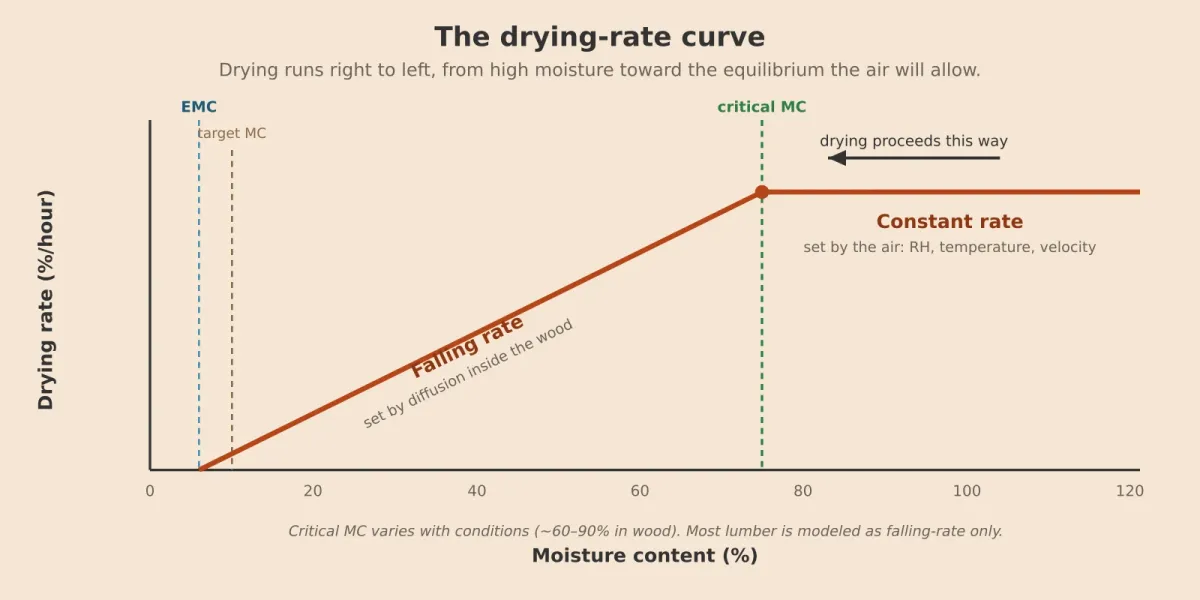
Plot how fast a board loses moisture against how much moisture it has left, and you get a characteristic two-part curve. It is the single most useful picture in drying.
The constant-rate period
At high moisture content the drying rate is flat and independent of moisture content. The surface is wet, capillary flow keeps it supplied, and the rate is set entirely by external conditions — the air's relative humidity, temperature and velocity. This is the constant-rate period. In practice you only see a real constant-rate period in very permeable wood (sapwood, or naturally permeable species); in impermeable wood, thick pieces, at high temperature, or after any pre-drying, it is short or invisible.
The falling-rate period
Below a critical moisture content — which varies with conditions but runs roughly 60–90% in wood — the surface can no longer stay wet, and drying becomes internally controlled by diffusion. Now the rate falls as the wood dries: the drier the wood, the slower it gives up its remaining water. The rate is governed by the wood's temperature and moisture content and its diffusion coefficient, and is more or less independent of air velocity. It reaches zero when the wood arrives at the equilibrium moisture content (EMC) — the moisture content at which the wood is neither gaining nor losing water in the surrounding air (see Wood Science 101 for EMC in detail).
Most lumber can be modeled as falling-rate only. Two consequences fall straight out of that, and both matter on the kiln floor:
- Wood dries slowly as it approaches its target. Because the rate is proportional to (MC − EMC), the last few points of moisture take the longest. The tail of the curve is where the days go.
- You must set the kiln's EMC below your target. If you want 8% wood you have to hold the air drier than 8% EMC, or the rate reaches zero before the wood gets there. Push the EMC lower and you dry faster — but you widen the moisture gradient through the board and raise the risk of the checking and honeycomb in section 6. That trade — EMC versus time, and EMC versus variability — is the heart of kiln control.
Wood factors
Two boards in the same charge do not dry alike. The rate for any given board depends on:
- Specific gravity. Denser wood dries more slowly, and carries more water weight to remove per point of moisture content.
- Heartwood vs sapwood. Heartwood is generally slower — its plumbing is more occluded.
- Species and green moisture content. Both vary enormously; compare the numbers in our wood species guide.
- Grain direction. Water moves far faster along the grain than across it, so end grain dries much faster than face grain — which is exactly why board ends check first.
That natural variability in the wood is why a kiln charge finishes with a spread of moisture contents, not a single value — and why the schedule ends with an equalizing step to pull that spread back together.
4. The kiln and how it is controlled
A kiln is a box that holds a stickered stack of lumber, blows heated air across it, and vents the moisture. As that air crosses the load it changes.
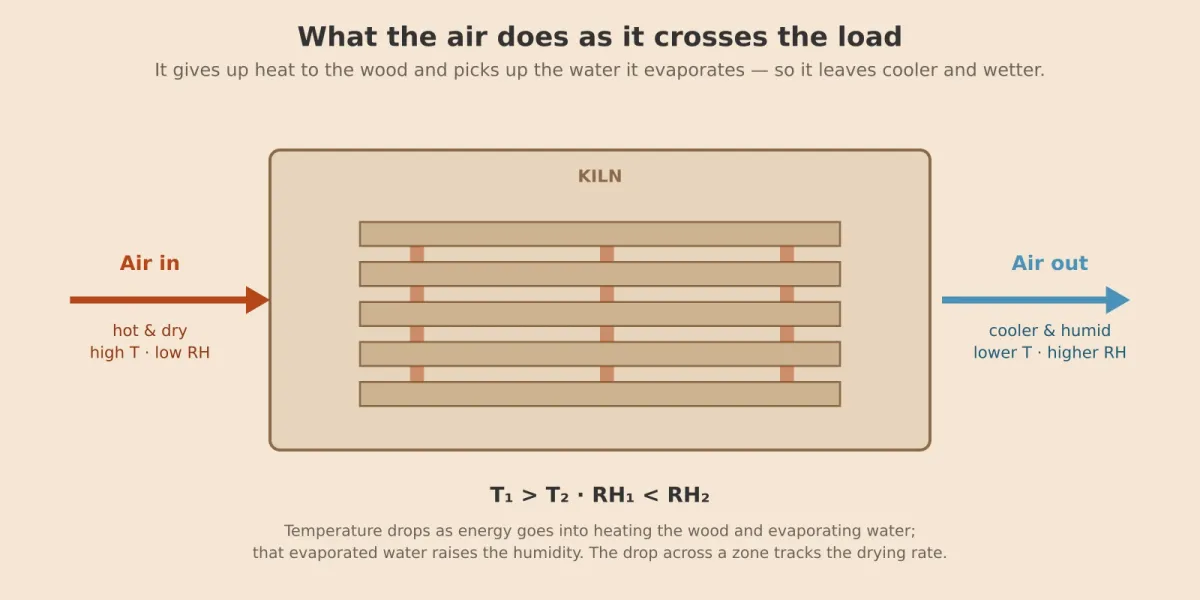
The air enters hot and dry and leaves cooler and more humid: it gives up heat to warm the wood and evaporate its water, and carries that evaporated water away. So temperature drops and humidity rises from inlet to outlet — and the size of the temperature drop across a zone is a good live indicator of how fast the wood is drying.
Measuring the three variables
Three things are controlled — temperature, relative humidity and air velocity — and drying is really the art of correlating those measurements back to the wood's moisture content.
- Temperature is read with thermocouples (cheap, simple, a little noisy) or RTDs (resistance temperature detectors — more stable, more expensive). Both dry-bulb and wet-bulb temperatures are tracked.
- Humidity is read by wet-bulb psychrometry: a second temperature sensor wrapped in a wetted wick, with air moving over it. The gap between the dry-bulb and wet-bulb temperatures — the wet-bulb depression — tells you the humidity, and through it the EMC the air is holding the wood to. Other humidity sensors rarely survive the heat and organic acids of a kiln.
- Air velocity is usually not measured after commissioning; instead the fans are run on variable-frequency drives, and airflow is dialed down as the wood dries (it saves energy, and lower airflow is fine once the wood is in the falling-rate period).
Two reference tools do the translation. The psychrometric chart relates dry-bulb temperature, wet-bulb temperature, humidity and the air's moisture content. An EMC table (from the USDA Wood Handbook) then converts a temperature-and-humidity condition into the equilibrium moisture content the wood will chase. Set the chart conditions, and you have set the wood's destination.
Heating the kiln
Heat is delivered two ways. Direct heating mixes combustion gases into the air stream — cheaper, but harder to control, a fire risk, and essentially obsolete in modern lumber kilns. Indirect heating keeps the heating medium out of contact with the wood, running steam, hot water or hot oil through finned coils. Indirect steam coils are the standard. (Steam carries roughly 1,000 BTU of latent heat per pound of water it condenses, which is what makes it such an effective way to move heat into a kiln.)
Kiln types
- Package kilns load fork-lifted packages of lumber; lower cost, less real estate, generally used for slower-drying woods.
- Track kilns roll lumber in on carts for fast load/unload and a short airflow path; generally used for faster-drying woods. Continuous track kilns move lumber through in a steady stream.
- Radio-frequency vacuum kilns heat the water directly with an electromagnetic field while a vacuum lowers the boiling point — fast, gentle on thick or difficult stock, and able to dry mixed thicknesses together, at higher capital cost.
A working kiln is divided into control zones down its length, each with its own temperature sensor and steam valve, so the whole charge dries evenly. One or two wet-bulb sensors serve the whole kiln so the vents open together. Controllers can hold to entering-air conditions (traditional, common for hardwoods) or exiting-air conditions (which reduces moisture-content variability between zones).
Energy, in round numbers
In theory it takes about 2,800 kJ to remove a kilogram of water from wood — the sensible heat to warm the wood and water, plus the latent heat of vaporization, plus a bit extra to break the bound water out of the cell wall. In practice, kiln inefficiency pushes that to 3,500–10,000 kJ/kg. At 50% efficiency you spend 5,600 kJ per kilogram; the rest leaks out through the walls, the exhaust air, the fans and the intake air you have to heat. Natural gas burns clean at over 80% efficiency but costs more per BTU; biomass is cheaper and often available on site, at 65–70% efficiency and with more emissions to control. You cut energy use by recycling air, running higher humidity and lower airflow, drying to a higher final MC where the end use allows, insulating and maintaining the kiln — and, when the climate cooperates, air-drying before the kiln.
5. The kiln schedule
You do not run a kiln at one setting. A schedule is a planned sequence of dry-bulb and wet-bulb temperatures that walks the wood down safely:
- Start gentle. Lower dry-bulb temperature and a small wet-bulb depression — meaning a high EMC and a slow rate — while the wood is wettest and weakest. Rush this stage and you check the surface.
- Ramp up. As the wood dries and toughens, raise the dry-bulb temperature and widen the wet-bulb depression (lower EMC) to keep the rate up.
- Equalize. Hold conditions until the fast and slow boards in the charge converge on the target, pulling in the moisture-content spread.
- Condition. Briefly raise the humidity at the end to relieve the residual drying stress (casehardening) — more on that below.
Whether the setpoints step on moisture content (hardwoods, and any hard-to-dry stock, where the wood tells the kiln when to advance) or simply on time (softwoods and easy hardwoods) is the main branch in schedule design. Either way the exact sequence depends heavily on species and thickness — published references such as the Forest Products Laboratory's Dry Kiln Schedules for Commercial Woods exist precisely because there is no one schedule.
6. Drying defects and their causes
Nearly every drying defect traces to one fact: the shell dries before the core, so the two parts of a board try to shrink at different times. That differential shrinkage sets up internal stress, and if the stress beats the wood's strength, something tears.
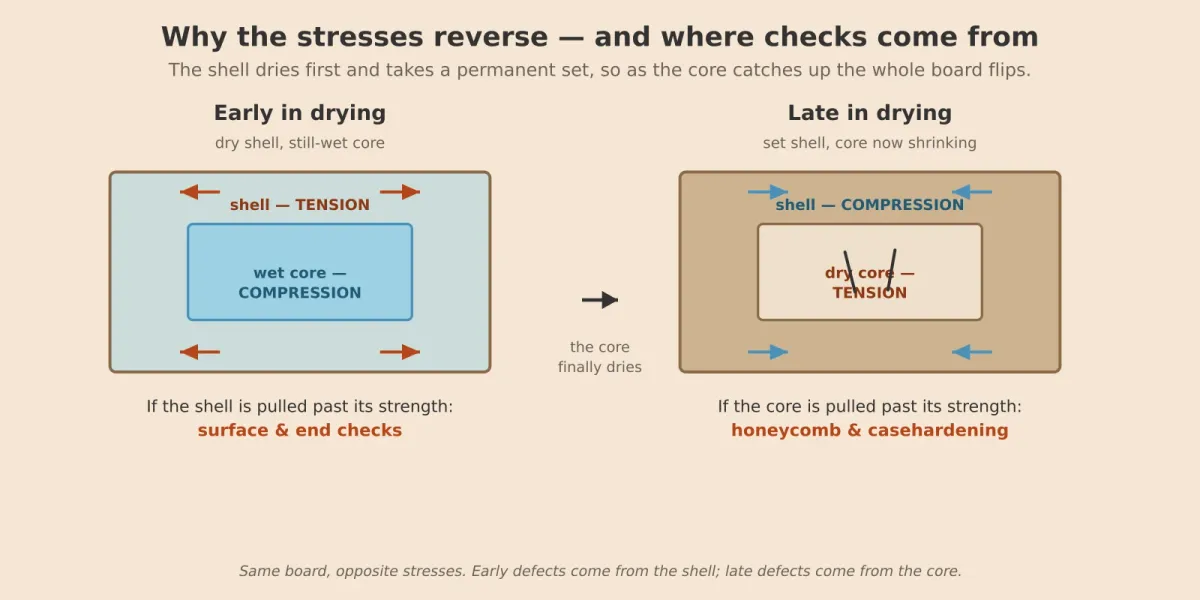
Read that diagram left to right, because the stresses reverse partway through drying:
Early: the shell is in tension
At the start the shell dries and tries to shrink while the wet core holds it back. The shell goes into tension, the core into compression. Two things can go wrong:
- Surface and end checks. If the shell's tension exceeds the wood's strength perpendicular to the grain, it splits — on the face (surface checks) or, because end grain dries fastest, on the ends (end checks). The cause is drying too hot, or holding the EMC too low (too big a wet-bulb depression) so the moisture gradient is steep. End-coating the boards slows the ends down. Checks are common in oaks, maples, alder — and softwoods too.
- Collapse. Distinct from checking: capillary forces from evaporating free water actually buckle the cell walls and flatten the cavities, leaving a washboarded, distorted cross-section. It happens early, in wet wood, and you avoid it with lower temperature and higher humidity at the start. Collapse — unlike a check — can sometimes be recovered by steaming, provided the wood has not also checked.
The set — why it reverses
Held under stress, wood takes a permanent set: cell-wall polymers slip and the shape does not spring back. The stretched shell "sets" larger; the squeezed core "sets" smaller. So when the core finally dries and tries to shrink, the already-set shell will not let it — and the stresses flip.
Late: the core is in tension
Now the shell is in compression and the dry core in tension. Two more defects live here, and both show up when the core is still wet (over ~20% MC) and the wood is weakened by heat:
- Honeycomb. Internal checks that open in the core under tension — often invisible from outside until the board is crosscut. Caused by pushing temperature too hard while the core is still wet.
- Casehardening. Not a crack but a locked-in stress: the finished board has a compressed shell and a tensioned core. Rip it and it pinches the saw; machine it and it warps. You cannot see it, but a prong test — cutting a comb of tines from a cross-section and watching them bend inward — reveals it. The fix is the conditioning step: add moisture back into the shell at the end so it swells and takes a compression set, relieving the stress.
The rest of the catalog
- Warp — bow, crook, cup and twist — from uneven shrinkage through the board, driven by grain and by where the board sat in the log (see the planes of wood in Wood Science 101). Good stickering and restraint control it.
- Moisture-content variability across the charge — a defect in itself, and the reason for the equalizing step.
- Stain — iron stain from wet contact with steel, and sticker stain where the stickers sat.
- Knot fallout as knots dry and loosen.
- The wrong final moisture content, which is a defect too. Rules of thumb: structural lumber below 19%, millwork and shop lumber below 12%, and furniture and flooring around 7%.
7. What this means when you buy lumber
You will not run a kiln, but you live with its results. The practical takeaways:
- Buy to the right moisture content for the end use, not just "kiln dried." Flooring at 12% will move in a conditioned interior; structural stock at 19% is fine in a frame.
- Acclimate on site. Wood arrives at the mill's EMC and will chase the jobsite's. Give it time to get there before you fasten it down — the same lesson as in Wood Science 101.
- Read the defects. Surface checks, honeycomb on a crosscut, a board that pinches the saw — each one tells you how it was dried, and whether it belongs in your project.
- Match the species to the job. Green moisture content, density and shrinkage drive how a species dries and how it will behave afterward; the numbers are in our wood species guide.
Nova USA Wood Products supplies naturally durable hardwoods and modified woods, dried and conditioned for the way they will be used. Compare species in the wood species guide, browse the product catalog, or pull spec sheets from the downloads library.
Questions about drying, moisture or specifying for your climate? Email Micah directly at micah@novausawood.com. Mahalo nui loa.
Keep reading
Wood Science 101
The companion course: how wood is built, why it moves, what modification changes, and how it fails.
Wood Species Guide
Green moisture content, specific gravity and shrinkage vary by species — the numbers that drive drying.
Technical Downloads
Installation guides and spec sheets for kiln-dried Nova products.
Product Catalog
Naturally durable hardwoods and modified woods, dried and conditioned for the way they are used.